Testing is Easy in Golang

Unlike many programming languages, where it is necessary to rely on third-party libraries to test code, Go has built-in support for testing. Not only that, but it is quite a capable testing system, ready to handle large, production grade applications. In this article, I will prove that getting started with testing your Go code is easy!
Writing your first test
To get started, let’s go ahead and setup a test for a single function. For this article, I will be testing some code I wrote for an application not too long ago. If you already have a function you would like to test, feel free to skip the next section!
Function setup
Let’s create a file in our application called time.go:
touch time.goWithin this file, we will test a function called timeAgo. This function takes a Go timestamp (time.Time) struct as input, and returns a string describing how long ago the timestamp occured. This is often the preferred way of rendering dates, in contexts where the exact date is not particularlly important. Paste the following code into the file, making note of the comments:
// replace package name if necessary
package main

import (
	"fmt"
	"math"
	"time"
)

// helper function that will "pluralize" a string, when n > 1
func pluralize(s string, n int) string {
	if n == 1 {
		return s
	}

	return fmt.Sprintf("%ss", s)
}

func timeAgo(pastTime time.Time) string {
	difference := time.Since(pastTime)
	ago := "%d %s ago"

	seconds := int(math.Round(difference.Seconds()))
	if seconds < 60 {
		return fmt.Sprintf(ago, seconds, pluralize("second", seconds))
	}

	minutes := int(math.Round(difference.Minutes()))
	if minutes < 60 {
		return fmt.Sprintf(ago, minutes, pluralize("minute", minutes))
	}

	hours := int(math.Round(difference.Hours()))
	if hours < 24 {
		return fmt.Sprintf(ago, hours, pluralize("hour", hours))
	}

	days := hours / 24
	if days < 7 {
		return fmt.Sprintf(ago, int(days), pluralize("day", days))
	}

	weeks := days / 7
	if weeks < 4 {
		return fmt.Sprintf(ago, weeks, pluralize("week", weeks))
	}

	months := min(12, max(1, days/30))
	if days < 365 {
		return fmt.Sprintf(ago, months, pluralize("month", months))
	}

	years := days / 365
	return fmt.Sprintf(ago, years, pluralize("year", years))
}
The code itself is relatively simple:
- We start out by showing the time as seconds ago.
- If the number of seconds since the timestamp exceeds 60, we show the time as minutes ago.
- If the number of minutes since the timestamp exceeds 60, we show the time as hours ago.
- etc.
However, due to the number of cases needed to consider, there are many opportunities for mistakes. And manually testing this function is non-trivial in most application contexts — you would either need to generate a large amount of synthetic data with various dates, or write a bunch of temporary code within your application, both of which are cumbersome approaches. Writing an actual test is by far the easiest approach!
Edit: After releasing this article, I actually found a bug with this function! My original code had a more naive approach for calculating the month, which is more intuitive, but caused a slight bug. Thankfully, having testing setup for this function made the bug very easy to track down, and fix!
The new month calculation seems odd, but do keep in mind, I am not concerned with this function being completely accurate in the context of my application. It just needs to be a good enough estimate for most cases.
Test setup
Let’s create a new file for testing this function:
## replace `time` with the name of the file containing your function,
## if necessary
touch time_test.go
Please note that the name of this file does matter!
- Appending the name of the file with
_testtells thego testcommand that the file contains tests. - The part before
_testis not as important, but a typical Go convention is to match the name of the file whose code you are testing.
Within the file, let’s add the following:
// replace package name if necessary
package main

import (
	"testing"
	"time"
)

func TestTimeAgo(t *testing.T) {
    // timestamp from 10 seconds ago
	timestamp := time.Now().Add(-10 * time.Second)

    expected := "10 seconds ago"
    actual := timeAgo(timestamp)

    if actual != expected {
        t.Errorf("got %q; want %q", result, actual)
    }
}
What’s going on in this simple example?
- Notice the function signature:
func(t *testing.T). All Go test functions must have this signature. - The function name also matters. Particularlly, the fact that it begins with
Test, and the proceeding character is capitalized. The typical naming convention is TestFuncName, where FuncName is the name of the tested function, capitalized. - The body of this function is, for the most part, standard Go code! However, there are a few things to keep in mind:
- When t.Errorf() is called, a test is marked as “failed”, and execution continues. In our example, this occurs when the result of calling our function does not match the expected value. This function behaves similarly to fmt.Printf(), and will output the message during testing.
- There are many other functions that will mark the test as “failed”, such as
t.Fail(),t.FailNow(),t.Fatal(), etc. See the go testing documentation for more information. - If none of these functions are invoked during execution, the test will pass.
With this, we have all we need to run a test! Run the following command to do so:
## package_path is the directory, relative to your current
## location, where your test file is defined
go test <package_path>
Assuming your test passes, the output should look like the following:

In this output, we see that the test passed (ok), and the time it took to run the test (0.011s).
Note: The screenshot above was taken by running all the tests within the ./cmd/web directory of an application I am working on.
This is a great start. But we can do a lot better!
Subtests
Our example is fine so far, but it’s not actually that useful, as we are only testing a single case! For a function with many possibilities like this one, we need to test many cases. To do this, we need to add subtests to our example. In Go, the idiomatic way of doing this is a table-driven testing approach:
func TestTimeAgo(t *testing.T) {
	tests := []struct {
		name      string
		timestamp time.Time
		expected  string
	}{
		{
			name:      "Seconds ago",
			timestamp: time.Now().Add(-10 * time.Second),
			expected:  "10 seconds ago",
		},
		{
			name:      "Minutes ago",
			timestamp: time.Now().Add(-20 * time.Minute),
			expected:  "20 minutes ago",
		},
		{
			name:      "Hours ago",
			timestamp: time.Now().Add(-4 * time.Hour),
			expected:  "4 hours ago",
		},
		{
			name:      "Days ago",
			timestamp: time.Now().Add(-2 * 24 * time.Hour),
			expected:  "2 days ago",
		},
		{
			name:      "Weeks ago",
			timestamp: time.Now().Add(-2 * 24 * 7 * time.Hour),
			expected:  "2 weeks ago",
		},
		{
			name:      "Months ago",
			timestamp: time.Now().Add(-7 * 24 * 30 * time.Hour),
			expected:  "7 months ago",
		},
		{
			name:      "Years ago",
			timestamp: time.Now().Add(-6 * 24 * 365 * time.Hour),
			expected:  "6 years ago",
		},
		{
			name:      "1 second",
			timestamp: time.Now().Add(-1 * time.Second),
			expected:  "1 second ago",
		},
		{
			name:      "1 minute",
			timestamp: time.Now().Add(-1 * time.Minute),
			expected:  "1 minute ago",
		},
		{
			name:      "1 hour",
			timestamp: time.Now().Add(-1 * time.Hour),
			expected:  "1 hour ago",
		},
		{
			name:      "1 day",
			timestamp: time.Now().Add(-1 * 24 * time.Hour),
			expected:  "1 day ago",
		},
		{
			name:      "1 week",
			timestamp: time.Now().Add(-1 * 24 * 7 * time.Hour),
			expected:  "1 week ago",
		},
		{
			name:      "1 month",
			timestamp: time.Now().Add(-1 * 24 * 30 * time.Hour),
			expected:  "1 month ago",
		},
		{
			name:      "1 year",
			timestamp: time.Now().Add(-1 * 24 * 365 * time.Hour),
			expected:  "1 year ago",
		},
        {
			name:      "About 1 month",
			timestamp: time.Now().Add(-1 * 24 * 29 * time.Hour),
			expected:  "1 month ago",
		},
		{
			name:      "About 1 year ago",
			timestamp: time.Now().Add(-1 * 24 * 363 * time.Hour),
			expected:  "12 months ago",
		},
	}

	for _, tt := range tests {
		t.Run(tt.name, func(t *testing.T) {
            actual := timeAgo(tt.timestamp)
            if actual != tt.expected {
		        t.Errorf("got: %q; want: %q", actual, tt.expected)
	        }
		})
	}
}
There are a few things to explain in the code above:
- The test begins by defining a table of test cases. Each element of the table contains:
- The name (name) of the subtest, which will show when running
go test - The input (timestamp)
- The expected output (expected)
- The name (name) of the subtest, which will show when running
- Then, we iterate over each element in the table, and use t.Run() to setup a subtest for each table element. t.Run() takes two arguments:
- The name of the subtest
- A callback function with the signature
func(t *testing.T), where we can define the subtest behavior. (Notice this is the same function signature that our parent function has!)
- Finally, the subtest body is practically identical to our original example! The only difference being that we have generalized the code to fit any example from the table, rather than a singular example.
With this setup, let’s rerun the go test command from earlier:
Remember how I said the subtest name would appear in the output of go test? Well, this is only true if we include the -v, or verbose flag, likeso:
go test <package_path> -vNow, if we run this command, you should see an output with more information, including subtest results:
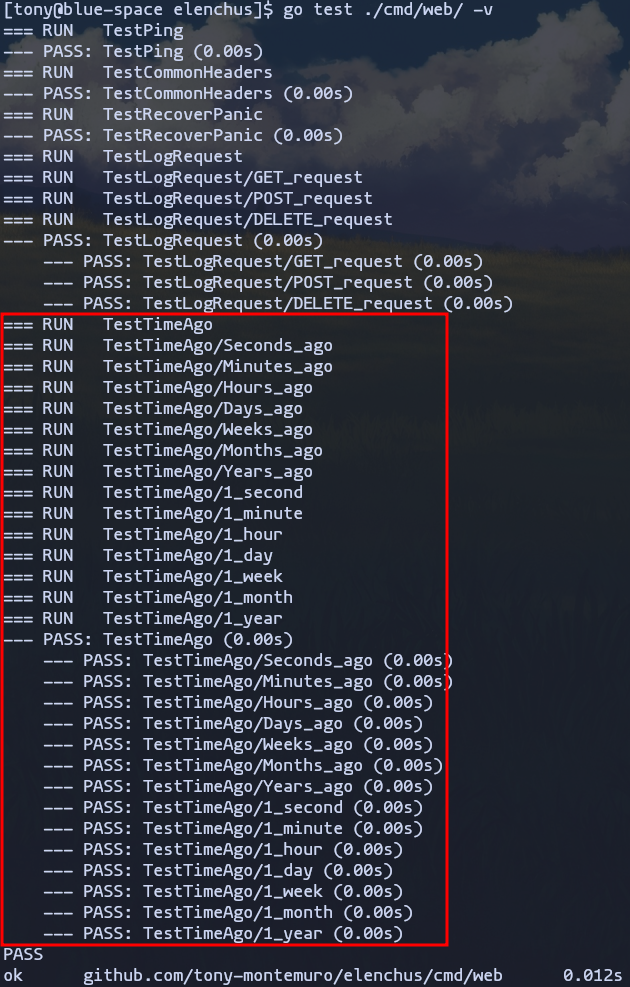
As you can see, we can see a much more detailed output, including the results of all tests / subtests in our application! The output within the redbox is from our TestTimeAgo function, which is what you should see in your output. For each subtest, the name, result, and execution time is logged.
The verbose flag -v is one of the most useful go test flags. But there are many other useful go test options worth pointing!
Go Testing Options
Running more than one test suite
Earlier, I showed the way to run all the tests within a package directory. However, if your project consists of multiple packages spread across many directories, there may be times you want to run a full test suite. This is actually possible using the following command:
## In Go, the `./...` is a wildcard pattern that essentially says:
## Do action in current directory, and all subdirectories recursively
go test ./...
Alternatively, you can run some, but not all test suites at once, by doing the following:
go test <dir_1> <dir_2> ... <dir_n>Running / skipping individual tests
There are times where you may only want to run a single test. For example, if your have a large application with lots of tests, running even just a single suite of tests can take a while. Thankfully, Go gives us an option to alleviate this problem:
go test <package_path> -run="{test regexp}/{subtest regexp}"Using regex, you can isolate the test to a single test, or potentially a subset of the available tests. We can use a similar approach to do the same thing, but in reverse (skipping tests):
go test <package_path> -skip="{test regexp}/{subtest regexp}"This is a suitable option if you have expensive tests that you would prefer to avoid.
Test cache
While following along, if you ran the same test multiple times, you may have noticed a (cached) annotation appended to the output, likeso:

This is because go test caches the result of testing a package, and will not break this cache until changes are made to the tested package. For the most part, this is great, especially for large applications. However, there may be a scenario where you want this test cache cleared. To do this, you can run:
go clean -testcacheIf you rerun any test, the result should no longer be cached.
Race detector
One neat feature of go test is the built-in race detector, which will attempt to spot potential race conditions in your code. This is an especially useful option if your application leverages Go’s excellent concurrency features. To enable this feature, it’s as simple as:
go test <package_path> -raceImportant: This is not a full-proof way of deteching race conditions! This tool simply flags any data races that occur at runtime during testing. This is not a static analysis tool, so your code can definitely still have race conditions, even if this feature did not detect any.
Conclusion
I hope you learned a thing or two about getting started with testing in Go! There are many more topics I could have went into, such as:
- Integration testing
- End-to-end tests
- Visualizing test coverage
- What to test
- & more!
If you would like me to share some information about these, please don’t hesitate to reach out! Happy testing!