Golang HTML Templates in Neovim
Unlike Go itself, setting up Neovim to handle it’s HTML templates is a bit tricky, but in this article, I will show you how it can be done.
Plugin manager
I use lazy.nvim to manage neovim plugins. Therefore, any instruction surrounding plugin installation will follow the lazy.nvim way of doing things.
If you use a different plugin manager, you should still be able to follow along with this guide. Just ensure to install any necessary plugins as you would with your plugin manager.
If you do not have a plugin manager installed yet, I recommend lazy.nvim! To get started with it, I would follow the structured setup installation.
Syntax highlighting
The most important part of this setup will be the configuration of syntax highlighting, which will make your templates much easier to read.
Tree-sitter
Tree-sitter is an incredibly useful tool, which provides a text editor with better “understanding” of the code structure. For our particular use case, this tool is critical for enabling syntax highlighting of our Go HTML templates.
nvim-treesitter plugin installation
nvim-treesitter is the plugin used to connect Neovim to Tree-sitter. Install and configure this plugin likeso:
return {
    {
        "nvim-treesitter/nvim-treesitter",
        build = ":TSUpdate",
        config = function()
            require 'nvim-treesitter.configs'.setup {
                ensure_installed = {},

                -- Automatically install missing parsers when entering buffer
                -- Recommendation: set to false if you don't have `tree-sitter` CLI installed locally
                auto_install = false,

                highlight = {
                    enable = true,

                    -- Disable highlighting for large files (for performance reasons)
                    disable = function(lang, buf)
                        local max_filesize = 100 * 1024 -- 100 KB
                        local ok, stats = pcall(vim.loop.fs_stat, vim.api.nvim_buf_get_name(buf))
                        if ok and stats and stats.size > max_filesize then
                            return true
                        end
                    end,

                    -- Setting this to true will run `:h syntax` and tree-sitter at the same time.
                    -- Set this to `true` if you depend on 'syntax' being enabled (like for indentation).
                    -- Using this option may slow down your editor, and you may see some duplicate highlights.
                    -- Instead of true it can also be a list of languages
                    additional_vim_regex_highlighting = false,
                },
            }
        end
    }
}
Once you have saved this plugin configuration, restart Neovim and run :checkhealth nvim-treesitter to ensure the installation went smoothly.
Installing tree-sitter parsers
Now that tree-sitter is installed, we have perhaps the easiest step: ensure the relevant parsers are installed! For Go HTML templates, we only need two:
gotmplhttp
However, I would expect you are also probably using Go directly, so I would also suggest:
go
Update your nvim-treesitter configuration to include these:
ensure_installed = {
    'gotmpl',
    'http',
    'go'
},
Detecting gotmpl files
Without any additional configuration, Neovim does not have any idea how to detect a gotmpl file. Luckily, Neovim gives us a way to define what a gotmpl file is. Add the following somewhere in your Neovim configuration:
-- gotmpl filetype
vim.filetype.add({
    extension = {
        gotmpl = 'gotmpl',
    },
    pattern = {
        [".*/templates/.*%.tmpl"] = "gotmpl",
        [".*/ui/.*%.tmpl"] = "gotmpl",
    },
})
It’s important to understand the pattern argument, as you may want to change this for your specific use-case. The pattern argument allows you to specifiy 1 or more lua patterns representing filepaths, which Neovim will attempt to match against when a filetype cannot be determined from the file extension alone.
In my example, we consider a file to be a gotmpl file if the following conditions are true:
- The file’s parent directory is
templatesORui - The file extension is
tmpl
You may want to change this, depending on how you structure your projects. If this is not done properly, syntax highlighting will NOT work!
Injecting HTML highlighting
You may be thinking: how does the HTML parser come into play? Well, it doesn’t, unless we inject it.
To do this, we need to create an injection file queries/gotmpl/injections.scm. Execute the following commands from the root of your Neovim configuration:
mkdir -p queries/gotmpl
touch queries/gotmpl/injections.scm
Next, open this new file, and paste the following code:
((text) @injection.content
 (#set! injection.language "html")
 (#set! injection.combined))
This code essentially injects the html parser into gotmpl files such that it is combined with the gotmpl parser. This allows Go-templating specific, as well as generic HTML, code to both have syntax highlighting.
Autocomplete
Autocomplete enables more efficient programming, by providing quick suggestions for Go template functions and variables, as well as HTML tags and attributes. To get this setup, we need to configure the Neovim LSP client to support the relevant language servers.
As a disclaimer, the following section assumes you are using Neovim >=0.11. If you are using an older version, please use nvim-lspconfig to setup the relevant language servers. If you currently are using nvim-lspconfig, I would suggest you keep using it — I personally opted not to use it.
Enable autocomplete in Neovim
There are two options I would suggest for getting autocomplete enabled in Neovim:
Configure built-in autocompletion, and install a snippet plugin
This is a good option if you already have autocomplete setup, but do not have snippets configured.
- If you do not have autocomplete setup, configure built-in autocomplete, or proceed to option 2.
- A snippet plugin is required for the HTML language server to provide completions.
Unfortunately, I have never used a standalone snippet plugin, so I don’t feel comfortable recommending one. However, I am sure there are many great options out there!
Install the
blink.cmpplugin for both autocomplete and snippetsblink.cmp is a completion plugin with support for LSPs, cmdline, signature help, as well as snippets. This is what I use personally, so I feel good about recommending it. Here is my configuration:
return {
    {
        'saghen/blink.cmp',
        dependencies = { 'rafamadriz/friendly-snippets' },

        version = '1.*',
        opts = {
            keymap = { preset = 'default' },

            appearance = {
                -- 'mono' (default) for 'Nerd Font Mono' or 'normal' for 'Nerd Font'
                -- Adjusts spacing to ensure icons are aligned
                nerd_font_variant = 'mono'
            },

            -- (Default) Only show the documentation popup when manually triggered
            completion = { documentation = { auto_show = false } },

            -- Default list of enabled providers defined so that you can extend it
            -- elsewhere in your config, without redefining it, due to `opts_extend`
            -- For this guide, ensure 'lsp' & 'snippets' are both included
            sources = {
                default = { 'lsp', 'path', 'snippets', 'buffer' },
            },

            fuzzy = { implementation = "prefer_rust_with_warning" }
        },
        opts_extend = { "sources.default" }
    }
}
blink.cmp is highly configurable, so I would suggest checking out the configuration documentation to see more configuration options (in fact, I should probably do the same…)
This is a great place to start, but without installing & configuring language servers for both go and html, we won’t have any autocomplete! Let’s set those up next.
Go autocomplete
gopls is the official language server of Go. In the context of Go HTML tempaltes, we can utilize this language server to provide autocomplete for Go template functions, variables, etc. Complete the following steps to setup gopls.
Installing gopls
There are a few ways to install gopls.
If you are using mason.nvim, a package manager for LSP servers, DAP servers, linters, and more, you can install
goplsthrough the mason TUI.- Disclaimer: I have yet to try
mason.nvim, but I have heard great things about it!
- Disclaimer: I have yet to try
Otherwise, you can directly install the package to your machine. This will obviously depend on the your operating system, so I will leave that as an excercise to the reader.
To test that the installation was a success, run:
gopls version
# output should look something like this:
# golang.org/x/tools/gopls (devel)
Configure gopls connection in Neovim
To configure Neovim to interact with gopls, we first need to create an LSP configuration file for Go:
mkdir -p lsp
touch lsp/go.lua
Open this file in Neovim, and paste the following code:
return {
    cmd = { "gopls" },
    root_markers = { "go.mod", ".git" },

    -- last 2 are optional, but if you use Go, probably useful
    filetypes = { "go", "gotmpl", "gomod", "gowork" },
    settings = {

        -- enable gopls to operate on additional filetypes (last one is optional)
        gopls = {
            templateExtensions = { "tmpl", "html" }
        },
    },
    single_file_support = true
}
This code configures the Neovim LSP client to connect to the gopls language server when relevant to-do so. This is the simple configuration I personally use — if you would like to further personalize your configuration, view the gopls settings documentation.
Enable gopls LSP client in Neovim
Now that we have a configuration defined for interacting with the Go language server, we need to actually enable it. To do this, add the following to your Neovim configuration:
vim.lsp.enable({
    ...,
    'go'
})
Importantly, the name will depend on the filename you gave to your configuration file. Therefore, if your file is instead called lsp/gopls.lua, replace ‘go’ with ‘gopls’.
HTML autocomplete
vscode-html-language-server is the most popular HTML language server. In the context of Go HTML tempaltes, we can utilize this language server to provide autocomplete for tags, attributes, etc. The setup for this is very similar to that of gopls, so I will go through it again with less detail.
Installing vscode-html-language-server
You can install vscode-html-language-server with mason.nvim Or, you can install this language server directly through an npm package called vscode-langservers-extracted, which installs language servers for the following languages:
- HTML
- CSS
- JSON
- ESLint
This is a nice option if you want to configure the Neovim LSP client to interact with two or more of these. To install this package globally, run:
npm i -g vscode-langservers-extractedI am not aware of a way to just install vscode-html-language-server directly, but I am sure it’s probably possible.
Configure vscode-html-language-server connection in Neovim
First, create an LSP configuration file for HTML:
touch lsp/html.luaOpen this file in Neovim, and paste the following code:
return {
    cmd = { 'vscode-html-language-server', '--stdio' },

    -- for this tutorial, only the 3rd value is technically necessary,
    -- but the first two will likely also be useful to have
    filetypes = { 'html', 'templ', 'gotmpl' },
    root_markers = { 'package.json', '.git' },
    settings = {},
    init_options = {
        provideFormatter = true,
        embeddedLanguages = { css = true, javascript = true },
        configurationSection = { 'html', 'css', 'javascript' },
    },
}
This is the simple configuration I use, courtesy of the default nvim-lspconfig default settings.
- Note: This GitHub repository is a great resource for starting your LSP client configurations, ironically, if you opt not to use the plugin itself.
Unfortunately, I was not able to find the settings documentation of this LSP. Thanks, Microsoft. Despite that, this configuration should be enough for most usecases.
Enable vscode-html-language-server LSP client in Neovim
Finally, we just need to enable the LSP client to recognize our configuration:
vim.lsp.enable({
    ...,
    'go',
    'html'
})
Whew! That’s quite a lot of steps, but if you did everything correctly, you should have autocomplete options visible within Go templates!
Indentation settings
The last step is to configure our indentation settings for gotmpl files. We can do this by creating a filetype plugin (or ftplugin). To setup our filetype plugin, execute the following commands from the root of our Neovim configuration:
mkdir -p after/ftplugin
touch after/ftplugin/gotmpl.lua
Now, open this file in Neovim. Indentation is mostly up to personal preference, so I would suggest reading about tabs and spaces in Neovim. If you just want something quick, however, consider my configuration:
vim.opt_local.tabstop = 2
vim.opt_local.shiftwidth = 2
vim.cmd('set noexpandtab')
To put it simply, this configuration will make TAB characters (\t) appear to be 2 spaces along.
- This is not the same as mapping the
TABkey to 2 spaces. This configuration keeps theTABkey mapped to\t. - I opt for tabs to be consistent with
gofmt, the Go language formatter, which usesTABfor indentation. - Finally, I like using a small
TABsize for HTML, as HTML can be deeply nested — 2 characters makes it easier for me to read.
And that’s all there is to indentation! Much easier than syntax highlighting and autocomplete!
Concluision
If you made it this far, congratulations! Your gotmpl should be much nicer to work with in Neovim. For reference, here’s what it might look like for you:
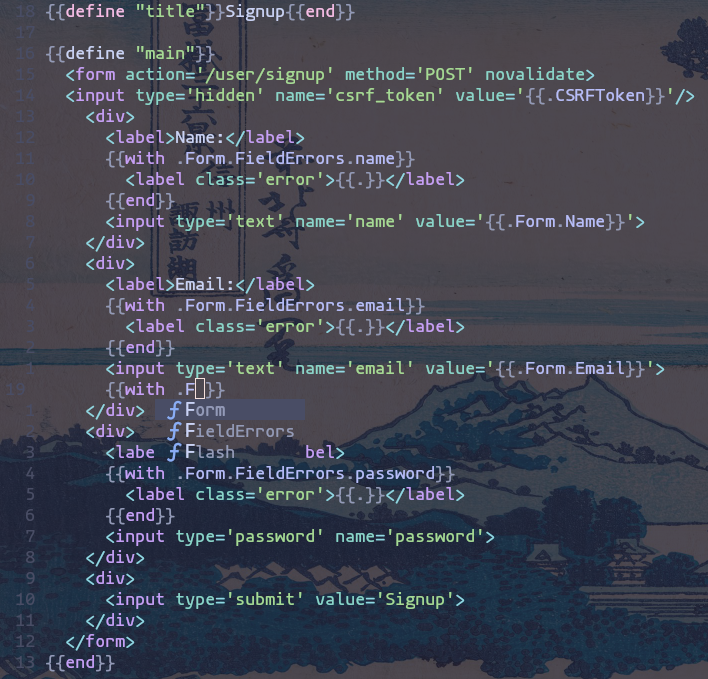
From this screenshot alone, you can see the:
- Beautiful, combined syntax highlighting of HTML and Go templating
- Autocomplete suggestions for Go templating
- 2-tab indentation
Finally, if at any point you got lost in this tutorial, I would suggest checking out my Neovim configuration on Github.