Dynamic, Animated Grid Background in Svelte 5
Tired of static backgrounds? Do you learn best via example? Well, you have come to the right place! In this post, I will walk through the process of how I created the dynamic, animated grid background on my portfolio website. Even if you opt to implement a different animation entirely, my hope is that you can learn some useful tips from this post. Let’s get started!
Component setup
Before we begin, let’s setup up the components necessary to render the background. Where you define these components in your project is not my concern (in my project, all components are placed in a common directory), but having these basic components is a great place to start:
- Background (background.svelte): A wrapper component that will render any children in the background of your application. (This is useful if you have more than one background in your application!)
- Line (line.svelte): This component will allow us to render the parts of the grid: the grid structure, as well as the animated line segments.
- Grid (grid.svelte): Renders the animated grid, and handles it’s associated logic.
- GridBackground (grid-background.svelte): This component will allow us to render our background using a single line of code, on each page.
TypeScript setup
If you are not using TypeScript, please skip ahead to the next section.
While we are at it, now would be a good time to initialize and define our TypeScript interfaces & types we will use in this project. I opted to export all my types & interfaces from individual Svelte modules, all located under a common directory. If you prefer to use .ts files for types, that works perfectly fine as well.
- Line interface ([typesDir]/point.svelte):
<script lang="ts" context="module">
  export interface Point {
    x: number;
    y: number;
  }
</script>- Point interface ([typesDir]/line.svelte):
<script lang="ts" context="module">
  import type { Point } from './point.svelte';

  export interface Line {
    p1: Point;
    p2: Point;
    id?: number;
  }
</script>- Grid interface ([typesDir]/grid.svelte):
<script lang="ts" context="module">
  export interface Grid {
    rows: number;
    cols: number;
    rowsGap: number;
    colsGap: number;
  }
</script>- Quadrant type ([typesDir]/quadrant.svelte):
<script lang="ts" context="module">
  export type Quadrant = 1 | 2 | 3 | 4;
</script>
Don’t worry about the why for these yet. They will be explained as they come up throughout the remainder of this post.
Background component
A good place to start is the Background component. It’s very simple, and in order to render a proper background, we need this component:
<script lang="ts">
  import type { Snippet } from 'svelte';

  interface Props {
    children: Snippet;
  }

  let { children }: Props = $props();
</script>

<div class="h-screen fixed top-0 right-0 bottom-0 left-0 -z-10">
  {@render children()}
</div>
If you are using my website as a reference, note that my implementation is slightly different: I use custom Tailwind CSS classes to take the navbar into consideration. See adding custom styles for more information.
Line component
The next thing worth building out is the Line component, as we need this to build the Grid background. Let’s start simple, and expand on this component later, when it becomes necessary:
<script lang="ts">
  import type { Line } from '[typesDir]/line.svelte';

  interface Props {
    line: Line;
  }

  let { line }: Props = $props();
  let { p1, p2 }: Line = line;
</script>

<line
  x1={p1.x}
  y1={p1.y}
  x2={p2.x}
  y2={p2.y}
  stroke="gray"
  stroke-opacity="0.3"
  stroke-width="2"
/>
Importantly, notice that we are using a line HTML tag for this component, which is an SVG element. Our Grid component, therefore, will be built as a dynamic SVG! Speaking of which…
Grid component
Introduction
There is a lot to unpack with this component, but I will break each part up into digestible bits, with the hope that it can all be easily understood. Let’s start with a diagram, which should hopefully illuminate the grid interface defined earlier:
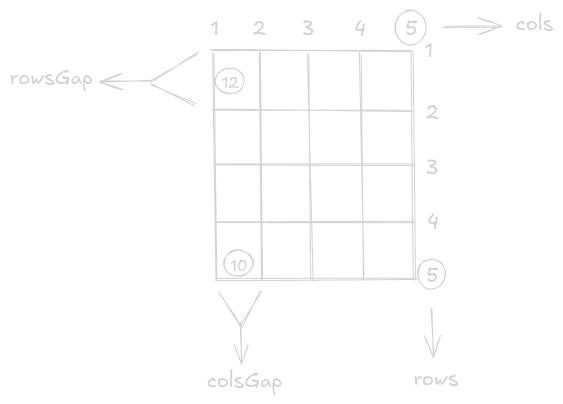
At a basic level, we can represent our grid with just four atomic elements:
- rows: The total number of rows of the grid. In the diagram, this value is
5. - cols: The total number of columns of the grid. In the diagram, this value is
5. - rowsGap: The space between each row, measured in pixels
px. In the diagram, this value is12. - colsGap: The space between each column, measured in pixels
px. In the diagram, this value is10.
We can get away with this, because unlike my subpar diagram, each cell in our grid will be of identical size. Therefore, this basic information is all we need to render the grid.
Before we worry about how we derive the grid values, let’s start constructing our Grid component with some necessary boilerplate:
<script lang="ts">
  import Line from '[componentDir]/line.svelte';
  import type { Grid } from '[typesDir]/grid.svelte';

  let grid = $state<Grid>({
    rows: 0,
    cols: 0,
    rowsGap: 0,
    colsGap: 0
  });

  let width = $state<number>(0);
  let height = $state<number>(0);
</script>

<div
  bind:offsetWidth={width}
  bind:offsetHeight={height}
  class="pointer-events-none h-full w-full"
>
  <svg class="h-full w-full">
    <!-- This is simply to visually see if things are working. This will be deleted later on. -->
    <Line line={{ p1: { x: 0, y: 0 }, p2: { x: 200, y: 200 } }} />
  </svg>
</div>
The most interesting part of this component is how width and height are binded to the offsetWidth and offsetHeight properties of our component respectively. This allows our background to dynamically react to changes in screen size, which we will address soon.
With this, we have enough to set up the final component.
GridBackground component
<script lang="ts">
  import Background from '[componentDir]/background.svelte';
  import Grid from '[componentDir]/grid.svelte';
</script>

<Background>
  <Grid />
</Background>
With this setup, try adding this component to a page component of your application, likeso:
<script lang="ts">
  import GridBackground from '[componentDir]/grid-background.svelte';
  ...
</script>

<GridBackground />
...
Regardless of the content of your page component, you should now see a line resembling a backslash \ character at the top left of the screen.
With this setup in place, all changes going forward should be visible from within the browser, which will be helpful going forward.
Calculating the grid values
Let’s start by considering rowsGap and colsGap. A naive approach might be to figure out values we are happy with, and simply add them to our grid definition:
<script lang="ts">
    ...
    let grid = $state<Grid>({
        rows: 0,
        cols: 0,
        rowsGap: a, // a is any number we might like
        colsGap: b  // same goes for b
    });
    ...
</script>
The flaw with this approach is that:
- The
rowsGapvalue will rarely, if ever, be divisible bywidth. - The
colsGapvalue will rarely, if ever, be divisible byheight.
And we are unable to just hardcode width and height, as these values are taken directly from the component (and by extension, the screen dimensions of a user).
Rather than hardcoding a rowsGap and colsGap value, let’s define a “target” cell length targetCellLength. Then, we can use mathematics to calculate rowsGap and colsGap values that approximate our target.
- In my case, I decided to have one target for both
rowsGapandcolsGap. Feel free to make a separate target for each if you desire non-square cells.
<script lang="ts">
  ...
  const targetCellLength = 40;

  function updateGrid() {
    const rows = Math.floor(height / targetCellLength) + 1;
    const cols = Math.floor(width / targetCellLength) + 1;
    const rowsGap = height / (rows - 1);
    const colsGap = width / (cols - 1);

    grid = { rows, cols, rowsGap, colsGap };
  }

  $effect(() => {
     if (width > 0 && height > 0) {
       updateGrid();
     }
  });

</script>
You may be wondering: how does the math work in upgadeGrid(), exactly? Consider this diagram, which focuses on columns (the same principles apply to rows):
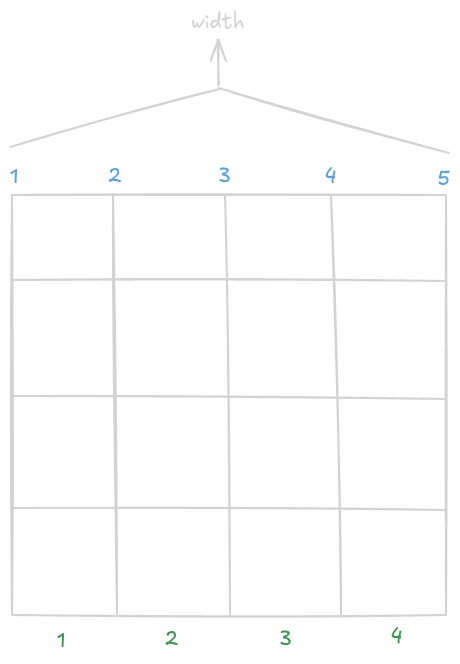
width / targetCellLengthdivides the width of our grid intotargetCellLengthsections.- Because we want all columns to evenly fit within the screen, we have to
floorthis value to drop the potential decimal points. - So far, our result would match up with the green numbers. However,
colsdoes not refers to these numbers, despite how we typically interpret a grid. In the context of rendering a grid, we care about the lines themselves, represented by the blue numbers. That is why I add1when calculatingcols. - The green numbers come in useful for the
colsGapcalculation, as we want to divide the width by the number of sections between each column, socols - 1.
Finally, you may notice the effect rune, which calls updateGrid() each time width and height change to non-zero values. This occurs when:
- The component first renders, where the
widthandheightstates are binded to the component. - Anytime the screen size changes (resizing a window, rotating a handheld device, etc.)
With this, we can effectively define our grid, regardless of screen size!
Tip: If you would like to verify that the
gridstate is behaving as described, consider adding an inspect rune to watchgrid. Then, open dev tools, and try resizing the browser window. You should observe the grid state print each time!
Rendering the grid
With our grid calculated, we can now render the grid! Add the following the Grid component:
<script lang="ts">
  ...
  import type { Line as LineType } from '[typesDir]/line.svelte';
  ...
  let backgroundLines = $derived.by<LineType[]>((): LineType[] => {
    if (width <= 0 && height <= 0) {
      return [];
    }

    const lines: LineType[] = [];
    for (let dx = 0; dx < grid.cols; dx++) {
      const x = dx * grid.colsGap;
      lines.push({
        p1: { x, y: 0 },
        p2: { x, y: height }
      });
    }

    for (let dy = 0; dy < grid.rows; dy++) {
      const y = dy * grid.rowsGap;
      lines.push({
        p1: { x: 0, y },
        p2: { x: width, y }
      });
    }

    return lines;
  });
  ...
</script>

<!-- Replace your markup with the following: -->
<div bind:offsetWidth={width} bind:offsetHeight={height} class="pointer-events-none h-full w-full">
  <svg class="h-full w-full">
    {#each backgroundLines as line}
      {#key line}
        <Line {line} />
      {/key}
    {/each}
  </svg>
</div>
To simplify our markup, I decided to use a separate derived rune backgroundLines, which will re-calculate each time grid updates. This value contains all the lines needed to render the grid.
Then, within the component markup, you can see that I am iterating over the derived backgroundLines, rendering each line to the screen.
The
{#key line}syntax forces the grid lines to re-render each timelineupdates. Without it, grid resizes will not render.
Grid animation
Introduction to snake animation
The animation we will create is largly inspiried by the game Snake, where a player has to manuver an ever-growing line along a grid. However, the animation we will create differs from the games in many ways. Let’s consider the properties of the snake we need to implement:
- The animation should update at a fixed tick-rate.
- The snake should move on it’s own with some form of randomness.
- The snake should wraparound the screen, meaning it will continue moving in the same direction, as it wraps to the other side of the screen.
- The animation should continue forever.
- Snake segments should slowly fade away as they remain on the screen, until they fully disappear.
Setting up the snake requires a good amount of logic, so I decided to separate all snake logic into a reactive class. That way, to our component, the only accessible logic is the constructor, as well as a function that will return our reactive representation of the snake, which we can render. Please create a snake-engine.svelte file somewhere in your project (in my case, I have a common directory for classes).
Designing the SnakeEngine class
Let’s begin by creating the class boilerplate:
<script lang="ts" module>
  import type { Line } from '[typesDir]/line.svelte';
  import type { Grid } from '[typesDir]/grid.svelte';
  import type { Quadrant } from '[typesDir]/quadrant.svelte';

  export class SnakeEngine {
    // contains our grid definition
    private grid: Grid;

    // specifies the direction our snake is facing at any given moment
    private direction: 'north' | 'east' | 'south' | 'west';

    // the tick rate, in ms, of our snake
    private rate: number;

    // the maximum length our snake should reach
    private length: number;

    // the initial quadrant our snake should render in (see below for more information)
    private initialQuadrant: Quadrant;

    // how far from the edge our snake should initially start at
    private initialPadding: number;

    // a unique identifier, which we will use *per snake segment* (see below for more information)
    private id: number = 1;

    // the data structure used to represent our snake: a queue of Line objects
    private snake = $state<Line[]>([]);

    constructor(grid: Grid, rate: number, length: number, quadrant: Quadrant, padding: number) {
      this.grid = grid;
      this.rate = rate;
      this.length = length;
      this.initialQuadrant = quadrant;
      this.initialPadding = padding;
      this.direction = this.getRandomDirection();

      // extend our snake every `this.rate` seconds
      setInterval(() => {
        this.extend();
      }, this.rate);
    }

    public getSnake() {
      // TODO: implement this method, which our component will use to render the snake
    }

    private getRandomDirection() {
      switch (this.getRandomNumberInRange(0, 3)) {
        case 0:
          return 'north';
        case 1:
          return 'east';
        case 2:
          return 'south';
      }
      return 'west';
    }

    private getRandomNumberInRange(lower: number, higher: number): number {
      return Math.round(Math.random() * (higher - lower) + lower);
    }

    private extend() {
      // TODO: implement this method, which will describe how we extend the snake on each tick rate
    }
  }
</script>
The above is the basics of our class. Using the attributes defined above, we can extend the snake every this.rate ms. The following are some attributes which I feel some extra attention, aside from the above comments:
direction: Personally, I did not care about defining which direction the snake is oriented it at the start, to be consistent with the random nature of the movement. Thus, I initializedirectionwith a random direction, where each of the 4 directions have equal odds.initialQuadrant: This attribute feels a bit unknown relative to the others, but should make sense later on in the tutorial. Essentially, I want to eventually render multiple snakes. By dividing our grid into quadrants, we can create nice “zones” to specify where the snake originates, to avoid the possibility of the snakes all rendering in the same place.initialPadding: Within aninitialQuadrant, this attribute prevents the snake from originating from withininitialPaddingspaces from an edge. It’s a relatively minor thing, but I prefer snakes to render away from edges.
Extending the snake
With this setup complete, now we can define our extend behavior. I will do my best to explain all the confusing bits with comments:
<script lang="ts">
  import type { Point } from '[typesDir]/point.svelte';
  ...

  private extend() {
    let prevPoint: Point, nextPoint: Point;
    let line: Line;

    this.randomRotate();
    prevPoint = this.getLastPoint();
    nextPoint = this.getNextPoint(prevPoint);
    line = { p1: prevPoint, p2: nextPoint, id: this.id };

    // if snake has extended beyond left-edge of screen, wrap to right-edge of screen
    if (nextPoint.x < 0) {
      nextPoint.x = this.grid.cols - 1;
      this.direction = 'west';
      line.p1 = nextPoint;
      line.p2 = this.getNextPoint(nextPoint);
    }


    // if snake has extended beyond right-edge of screen, wrap to left-edge of screen
    if (nextPoint.x >= this.grid.cols) {
      nextPoint.x = 0;
      this.direction = 'east';
      line.p1 = nextPoint;
      line.p2 = this.getNextPoint(nextPoint);
    }

    // if snake has extended beyond top-edge of screen, wrap to bottom-edge of screen
    if (nextPoint.y < 0) {
      nextPoint.y = this.grid.rows - 1;
      this.direction = 'north';
      line.p1 = nextPoint;
      line.p2 = this.getNextPoint(nextPoint);
    }


    // if snake has extended beyond bottom-edge of screen, wrap to top-edge of screen
    if (nextPoint.y >= this.grid.rows) {
      nextPoint.y = 0;
      this.direction = 'south';
      line.p1 = nextPoint;
      line.p2 = this.getNextPoint(nextPoint);
    }

    this.addLine(line);

    // will explain more below
    this.id = (this.id + 1) % (this.length + 1);
  }

  // 25% chance of moving left
  // 25% chance of moving right
  // 50% chance of moving straight
  // feel free to adjust these odds - i just prefer the snake to prefer moving forward
  private randomRotate(): void | undefined {
    switch (this.getRandomNumberInRange(0, 3)) {
      case 0:
        return this.rotateLeft();
      case 1:
        return this.rotateRight();
      default:
        // do nothing -- continue straight
    }
  }

  private rotateLeft(): void {
    // easier to rotate using point representation
    let p: Point;
    p = this.getPointDirection();
    [p.x, p.y] = [p.y, -p.x];
    this.direction = this.getStringDirection(p);
  }

  private rotateRight(): void {
    // easier to rotate using point representation
    let p: Point;
    p = this.getPointDirection();
    [p.x, p.y] = [-p.y, p.x];
    this.direction = this.getStringDirection(p);
  }

  private getPointDirection(): Point {
    // This representation allows us to use clever math to perform
    // rotations and motions -- see below for more details
    switch (this.direction) {
      case 'north':
        return { x: 0, y: -1 };
      case 'east':
        return { x: 1, y: 0 };
      case 'south':
        return { x: 0, y: 1 };
      case 'west':
        return { x: -1, y: 0 };
    }
  }

  private getStringDirection(p: Point) {
    // get back to a more human-understandable direction
    if (p.x === 0 && p.y === -1) return 'north';
    if (p.x === -1 && p.y === 0) return 'east';
    if (p.x === 0 && p.y === 1) return 'south';
    if (p.x === 1 && p.y === 0) return 'west';
    return 'north';
  }

  private getLastPoint(): Point {
    if (this.snake.length > 0) {
      return this.snake.at(-1)!.p2;
    }

    // on initial extend only, we need to pseudo-randomly determine the initial point
    return this.getInitialPoint();
  }

  private getInitialPoint(): Point {
    // use `initialQuadrant` to determine the lower + upper bound of our initial point coordinates
    let lowerX: number = 0,
      lowerY: number = 0,
      higherX: number = this.grid.cols,
      higherY: number = this.grid.rows;

    if (this.initialQuadrant === 1 || this.initialQuadrant === 2) {
      higherY = this.grid.rows / 2;
    }

    if (this.initialQuadrant === 3 || this.initialQuadrant === 4) {
      lowerY = this.grid.rows / 2;
    }

    if (this.initialQuadrant === 2 || this.initialQuadrant === 3) {
      higherX = this.grid.cols / 2;
    }

    if (this.initialQuadrant === 1 || this.initialQuadrant === 4) {
      lowerX = this.grid.cols / 2;
    }

    // limit our lower + upper bounds further based on `initialPadding`
    return {
      x: this.getRandomNumberInRange(lowerX + this.initialPadding, higherX - this.initialPadding),
      y: this.getRandomNumberInRange(lowerY + this.initialPadding, higherY - this.initialPadding)
    };
  }

  private getNextPoint(lastPoint: Point): Point {
    // using the point-representation of direction to move forward
    let pointDirection: Point,
      nextPoint: Point = { x: lastPoint.x, y: lastPoint.y };

    pointDirection = this.getPointDirection();
    nextPoint.x += pointDirection.x;
    nextPoint.y += pointDirection.y;

    return nextPoint;
  }

  private addLine(line: Line): void {
    // when snake reaches max length, it begins to behave
    // as a queue: first in, first out
    if (this.snake.length === this.length) {
      this.snake = [...this.snake.slice(1), line];
    } else {
      this.snake.push(line);
    }
  }
</script>
Wow, that sure is a lot. My hope is that with the comments, and some patience, most of it can be understood. However, there are two aspects of the code I would like to address in more detail:
- The id attribute: Don’t worry about the why just yet, but in order to properly render a snake, each line segment must have a unique identifier. In the
extend()method,idis updated at the end, but is limited tothis.lengthusing the modulo operator. This ensures that each line segment has a unique identifier, without the risk of reachingInfinity.- Realistically, you can probably ignore the modulo operation, as it would take an astronomically long time to reach
Infinity, even if you set a super-fast tickrate. However, it’s always good pratice to avoid these dangerous scenarios all together.
- Realistically, you can probably ignore the modulo operation, as it would take an astronomically long time to reach
- Point-representation of direction for manipulation: extensions & rotations: Personally, I find string-representation of directions easier to read. However, as good as they look, this representation is not all that useful mathematically. Therefore, my solution is to convert between the two, only using point-representation when we need math.
Rendering the snake animation
Finally, we are at a point where we have enough setup to render our animation! Let’s begin by implementing getSnake() in snake-engine.svelte:
<script lang="ts">
    ...
    public getSnake() {
      return this.snake.map((line) => this.translateLine(line));
    }

    private translateLine(line: Line): Line {
      const { p1, p2 }: Line = line;

      return {
        p1: { x: p1.x * this.grid.colsGap, y: p1.y * this.grid.rowsGap },
        p2: { x: p2.x * this.grid.colsGap, y: p2.y * this.grid.rowsGap },
        id: line.id
      };
    }
</script>
Why is translation necessary? Well, internally, we are representing the snake lines in a normalized form, where each line segment is of size 1. This makes it easier to perform operations on them. In order to properly render each line segment, we need to translate each line to the correct scale, defined by the gap attributes of the grid definition.
Now, finally going back to the grid component, we can introduce our animation:
<script lang="ts">
  import { SnakeEngine } from '[classesDir]/snake-engine.svelte';

  ...
  const snakeEngine = $derived.by<SnakeEngine | undefined>((): SnakeEngine | undefined => {
    if (width > 0 && height > 0) {
      // Creates a new snake that...
        // relies on grid
        // has a tickrate of 400
        // max length of 25
        // initial render in quadrant 1
        // must render 3 spaces away from quadrant edge
      return new SnakeEngine(grid, 400, 25, 1, 3);
    }
  });
  ...
</script>
...
<!-- within SVG tag -->
{#if snakeEngine}
  {#each snakeEngine.getSnake() as line (line.id)}
    <Line {line} />
  {/each}
{/if}
...
Now is a good time to understand why each line requires a unique identifier. In Svelte, you can key each list item (see parenthesis), which enables Svelte to perform more intelligent re-renders. In this case, it allows us to shift our queue on each iteration: because we associate each line with a key, this shift will not cause any unexpected re-renders.
Congratulations! The animation should now be rendering!
…sort of. We aren’t done yet. One big problem is that the animation is borderline impossible to see, since our Line component does not have a configurable color. Let’s fix this by adding optional stroke and opacity props to our Line component:
<script lang="ts">
  ...
  interface Props {
    line: Line;
    stroke?: string; // new optional prop
    opacity?: number; // new optional prop
  }

  let { line, stroke = 'grey', opacity = 0.3 }: Props = $props();
  ...
</script>

<line x1={p1.x} y1={p1.y} x2={p2.x} y2={p2.y} {stroke} stroke-opacity={opacity} stroke-width="2" />
And finally, back to Grid component, let’s add these additional argument to our snake engine lines:
...
{#each snakeEngine.getSnake() as line (line.id)}
  <Line {line} stroke="green" opacity={0.7} />
{/each}
...
And with that, now you should be able to clearly see the animation! It’s a bit choppy, but no need to worry, we will fix this issue in the next section.
Cleaning up the snake animation
There are two CSS animations we implement to dramatically improve the “cleanliness” of the snake animation:
- Dash animation: This animation will occur on a line segment as it first renders to the screen. This will make it look as though the snake is continuously dashing across the screen.
- Fade out animation: This animation begins once the dash animation completes, and continues on for the remainder of a line segment’s lifetime, slowly fading it out of view until it has been completely removed.
Let’s get these animations added to our line component:
<script lang="ts">
  ...
  interface Timers {
    dashTimer: number;
    fadeOutTimer: number;
  }

  interface Props {
    line: Line;
    stroke?: string;
    opacity?: number;
    timers?: Timers; // new optional prop
  }

  let {
    line,
    stroke = 'grey',
    timers = { dashTimer: 0, fadeOutTimer: 0 },
    opacity = 0.3
  }: Props = $props();

  ...
  let lineLength = $derived(Math.sqrt(Math.pow(p2.x - p1.x, 2) + Math.pow(p2.y - p1.y, 2)));
  let { dashTimer, fadeOutTimer }: Timers = timers;
</script>

<!-- Replace existing line tag with this -->
<line
  x1={p1.x}
  y1={p1.y}
  x2={p2.x}
  y2={p2.y}
  {stroke}
  stroke-opacity={opacity}
  stroke-width="2"
  stroke-dasharray={lineLength}
  class:animated={dashTimer > 0}
  style="--line-length: {lineLength}px; --dashTime: {dashTimer}ms; --fadeOutTime: {fadeOutTimer}ms"
/>

<style>
  @keyframes dash {
    to {
      stroke-dashoffset: 0;
    }
  }

  @keyframes fadeOut {
    from {
      opacity: 1;
    }
    to {
      opacity: 0;
    }
  }

  .animated {
    stroke-dashoffset: var(--line-length);
    animation:
      dash var(--dashTime) cubic-bezier(0, 0.5, 0.5, 1) forwards,
      fadeOut var(--fadeOutTime) ease-out forwards;
    animation-delay: 0ms, var(--dashTime);
  }
</style>
This might seem a bit alien to some of you, so let me try to unpack some of the weirdness:
timersis a new optional prop, which will control the animation durations of both animations mentioned above.- We use inline styling to define CSS variables.
- These CSS variables are used within a
styletag, which enables to have dynamic animations defined. - The first animation is performed using stroke property magic (that I admittedly don’t full understand yet…)
- The second animation is delayed until the first animation has completed.
- Finally, the animation class is only applied to the line if the timers are non-zero. Therefore, our original grid, which does not pass in any timers, will be unaffected!
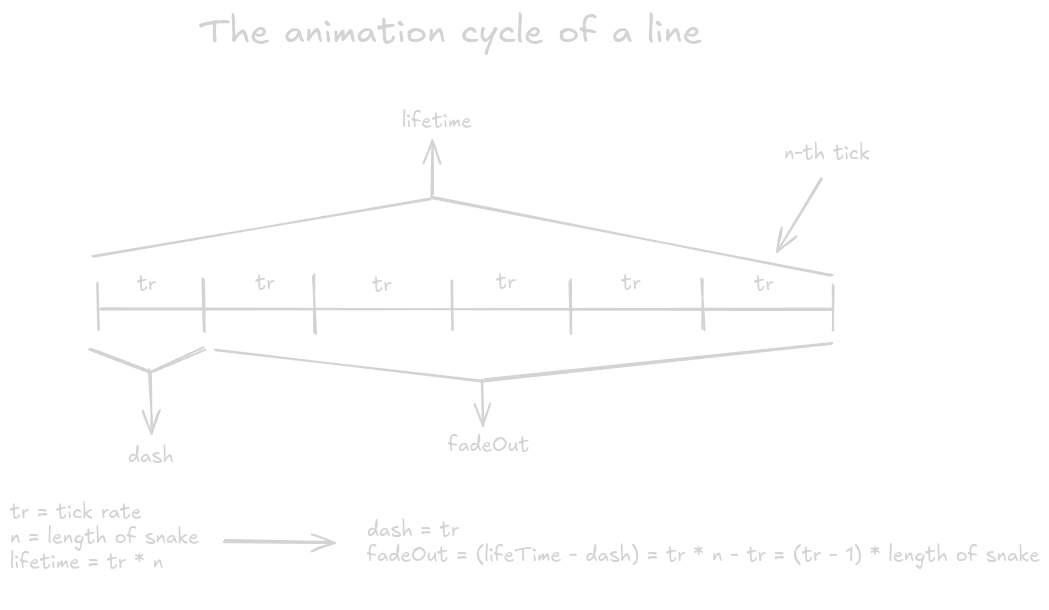
The last hurdle to get these animations working, is actually determining the timers! Consider the diagram:
To add this, let’s go back to our Grid component, and add the following:
<script lang="ts">
  ...
  const tickRate = 400;
  const numLineSegments = 25;
  ...

  // replace hard-coded arguments with new variables
  const snakeEngine = $derived.by<SnakeEngine | undefined>((): SnakeEngine | undefined => {
    if (width > 0 && height > 0) {
      return new SnakeEngine(grid, tickRate, numLineSegments, 1, 3);
    }
  });
  ...
</script>

...
{#each snakeEngine.getSnake() as line (line.id)}
  <Line
    stroke="green"
    {line}
    timers={{
      dashTimer: tickRate,
      fadeOutTimer: (tickRate - 1) * numLineSegments
    }}
    opacity={0.7}
  />
{/each}
...
It took a while, but finally, we have something that looks really nice! I would consider this minimually good, so if you are happy with the results, you can stop here. If at any point you got lost during this tutorial, the source code is available on my GitHub. However, there are a few improvements we can still make from here.
Extras
Replace Grid variables with props
If you intend to use your Grid component in multiple contexts, and would like to customize each grid per instance, I would suggest converting any variables to optional props with sensible default values. For example:
<script lang="ts">
  ...
  // remember: remove `numLineSegments`, `tickRate`, and `targetCellLength` variables
  interface Props {
    numLineSegments?: number;
    tickRate?: number;
    color?: string;
    targetCellLength?: number;
    lineOpacity?: number;
  }

  let {
    numLineSegments = 25,
    tickRate = 400,
    color = 'green',
    targetCellLength = 40,
    lineOpacity = 0.7
  }: Props = $props();
  ...
</script>

...
{#each snakeEngine.getSnake() as line (line.id)}
  <Line
    stroke={color}
    {line}
    timers={{
      dashTimer: tickRate,
      fadeOutTimer: (tickRate - 1) * numLineSegments
    }}
    opacity={lineOpacity}
  />
{/each}
...
Render multiple snakes
Why stop at 1 snake? We can render as many snakes as we would like! For example, on my website, I render 4 snakes by default. But for smaller screens, I only render 2. Here is how I set that up:
<script lang="ts">
  ...
  import type { Quadrant } from '$lib/types/quadrant.svelte';
  ...

  // remove SnakeEngined derived rune, and replace with the following:
  const snakeEngines = $derived.by<SnakeEngine[]>((): SnakeEngine[] => {
    if (width <= 0 && height <= 0) {
      return [];
    }

    let quadrants: Quadrant[];
    let padding: number;

    // For smaller screens, only two snakes
    if (grid.rows < 12 || grid.cols < 12) {
      quadrants = [2, 4];
      padding = 2;
    } else {
      quadrants = [1, 2, 3, 4];
      padding = 3;
    }

    return quadrants.map(
      (quadrant) => new SnakeEngine(grid, tickRate, numLineSegments, quadrant, padding)
    );
  });
  ...
</script>
....

<!-- Replace existing SVG with this -->
<svg class="h-full w-full">
    {#each backgroundLines as line}
      {#key line}
        <Line {line} />
      {/key}
    {/each}
    {#each snakeEngines as snakeEngine}
      {#each snakeEngine.getSnake() as line (line.id)}
        <Line
          {line}
          stroke={color}
          opacity={lineOpacity}
          timers={{
            dashTimer: tickRate,
            fadeOutTimer: (tickRate - 1) * numLineSegments
          }}
        />
      {/each}
    {/each}
  </svg>
If you actually made it this far, you are a legend! 😎 Remember, if you got lost somewhere, the code is on my GitHub! I hope you learned something new from this post!